The Ebco Folding Table Mount is a versatile and easy-to-use mounting system that allows you to create a foldaway table in any room. The mount is made of durable steel and features a heavy-duty hinge that can support up to 70 kilograms. The table top can be made from any material, including wood, glass, or laminate.
Here are some of the features of the Ebco Folding Table Mount:
Durable steel construction
Heavy-duty hinge
Supports up to 70 kilograms
Easy to install
Perfect for folding & storing tables
Ideal for square or round tables
Compatible for Ø76mm pipe
Aluminium lever for strength
'System 32" Compatible
Easy to fit & use
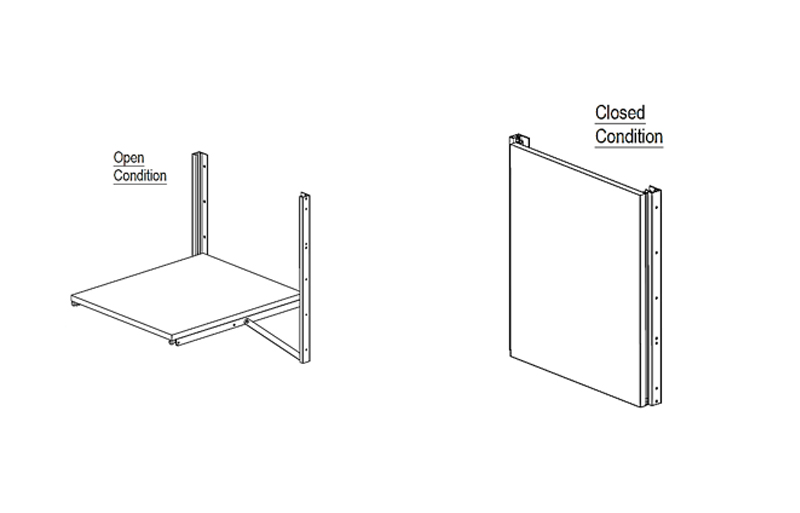
Folding table mechanism
The Ebco Folding Table Mount is a great way to create a foldaway table in any room. It is easy to install and can support a lot of weight. The mount is also compatible with any table top material, so you can use it to create a table that fits your needs.
Here are some of the benefits of using the Ebco Folding Table Mount:
Saves space: When the table is not in use, it can be folded up and stored away, saving space.
Convenient: The table can be folded out and put away quickly and easily, making it convenient for use in small spaces.
Durable: The mount is made of durable steel and can support a lot of weight, making it a long-lasting investment.
Versatile: It is compatible with any table top material, making it a versatile option for any home.
If you are looking for a way to create a foldaway table in your home, the Ebco Folding Table Mount is a great option. It is easy to install, durable, and versatile.
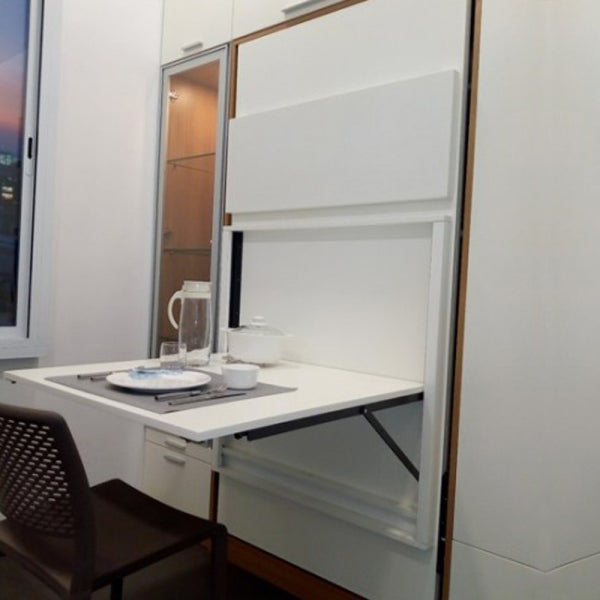
The EBCO Folding Utility Table is a versatile and space-saving solution for any room in your home. It can be used as a dining table, work table, or even a play table for children. The table is made of durable aluminum and steel construction and can support up to 70kg. It is also easy to fold and unfold, making it perfect for small spaces.
Multipurpose Folding Utility Table Fittings, Work from Home Tables
Here are some of the features of the EBCO Folding Utility Table:
Durable aluminum and steel construction
Supports up to 70kg
Easy to fold and unfold
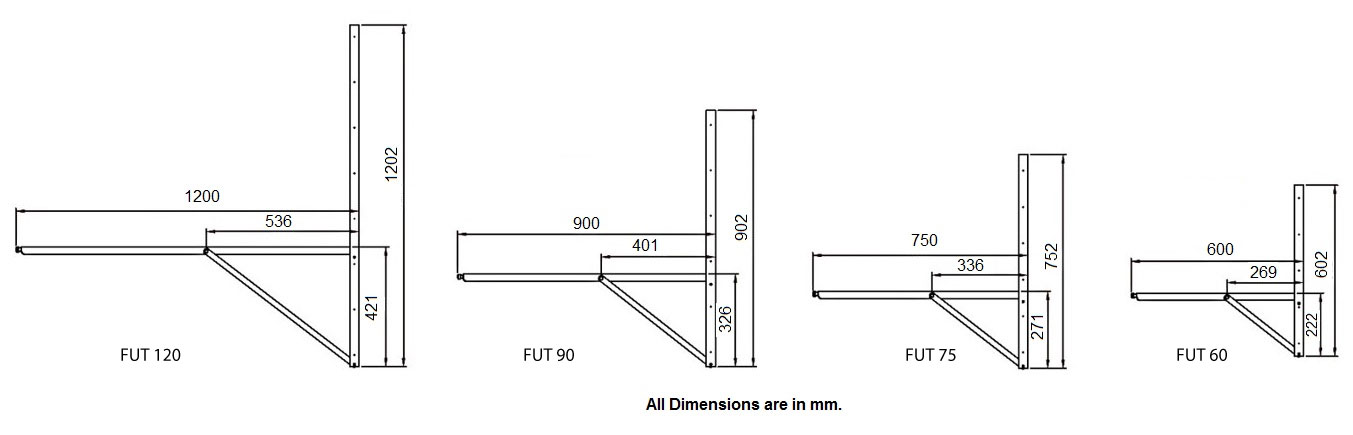
Available in four sizes: 600mm, 750mm, 900mm, and 1200mm
Does not include table top (must be purchased separately)
The EBCO Folding Utility Table is a great way to add extra seating or workspace to your home without taking up a lot of space. It is perfect for small apartments, condos, or homes with limited space. The table is also a great option for families with children, as it can be used as a play table or homework station.
This product enables you to have a fold away dining table
Can also be used a fold away work table in a room where space is limited
Does NOT include the table top – only includes the fittings
Special release knob helps to fold the table
Built for strength & durability
Maximum width 900mm - 3mm clearance is required on both sides
Available in 4 different sizes - 600mm, 750mm, 900mm and 1200mm
Load capacity: 70 kilograms
May not be suitable for table tops made of heavy materials such as stone, marble, granite, etc. However, this depends on size.
Model
Code
Size (mm)
Finish
Folding Utility Table
FUT60
600
Anthracite
FUT75
750
FUT90
900
FUT120
1200
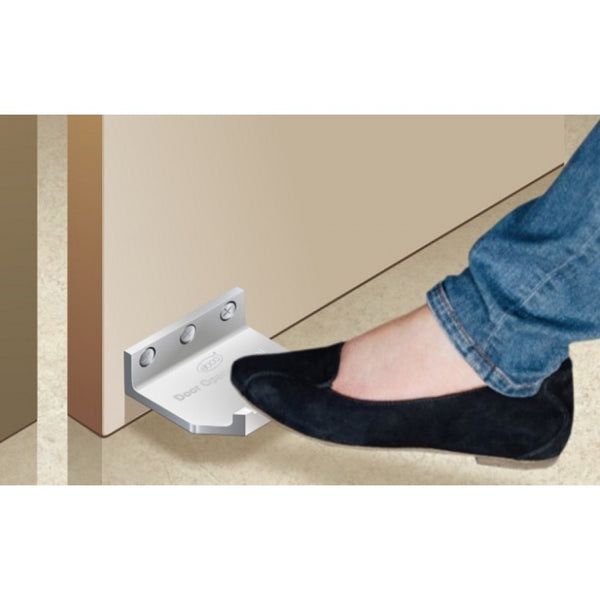
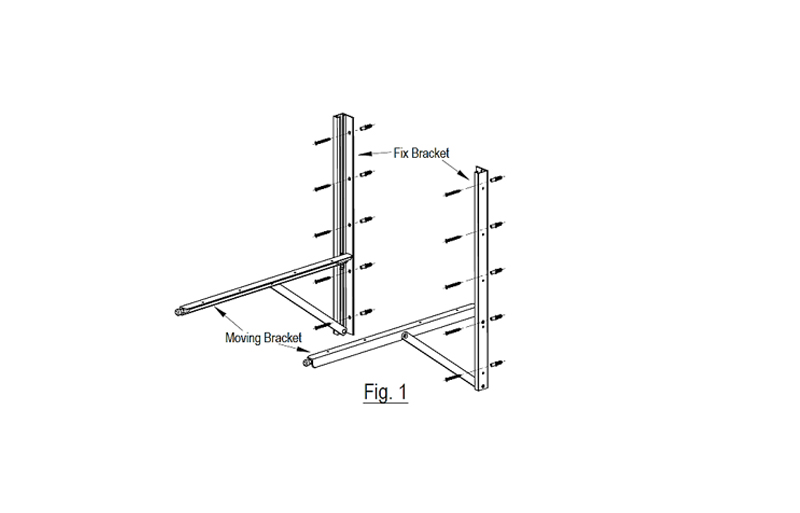
Mount the fixed bracket to the wall with wall plugs & screws as shown in Fig. 1.
The wall onto which the bracket is mounted must be of solid wood, Brick work or Concrete only, Do not use on Plywood, Blockboard etc.
Fit the table top onto the moving bracket with screws as shown in Fig. 2.
It can be folded & kept while not in use, pull the knob to fold the bracket as shown in Fig 2a.
*If you have any specific question related to the product & if you want to buy Sold Out products, please contact us.
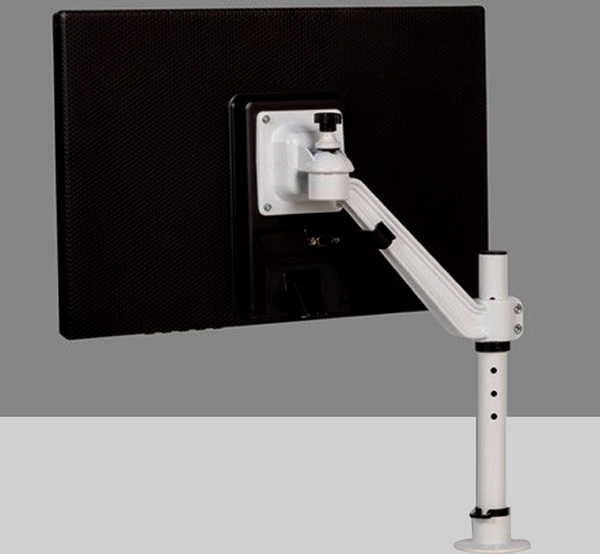
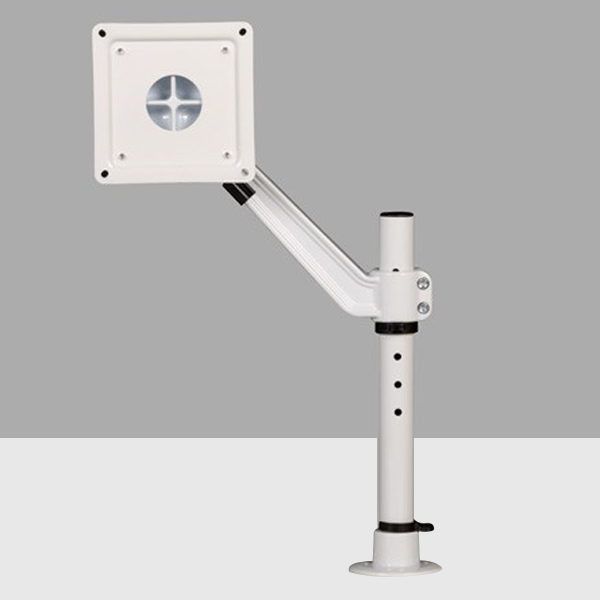
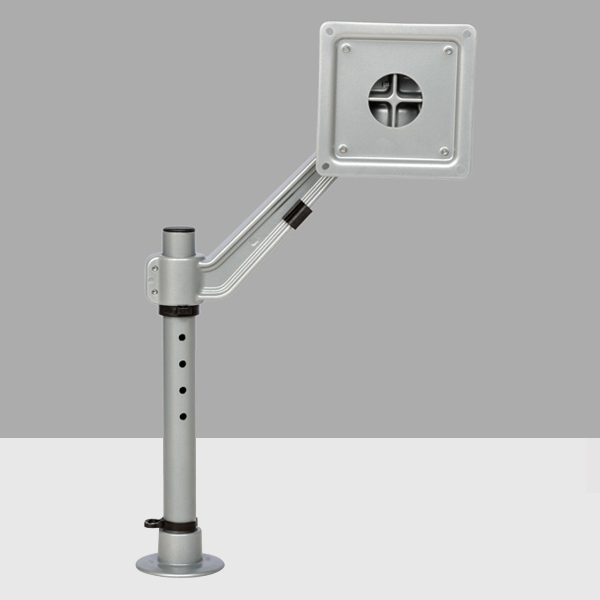
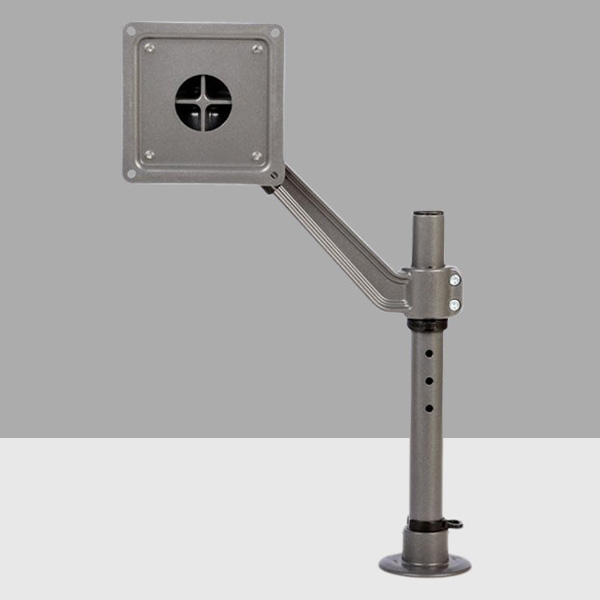
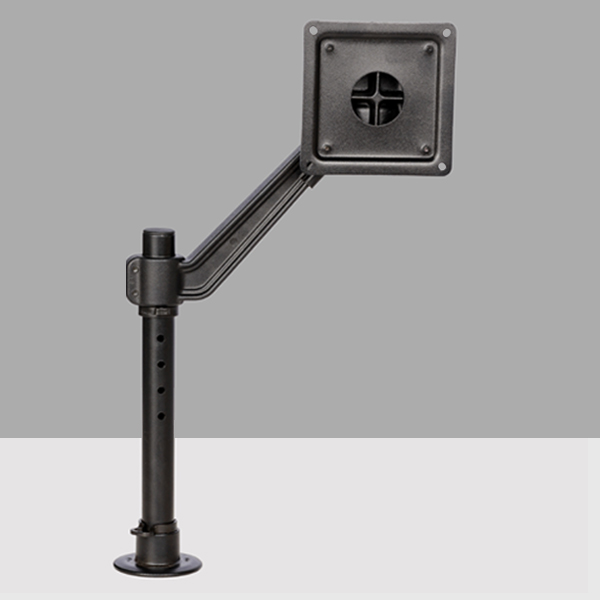
Overview
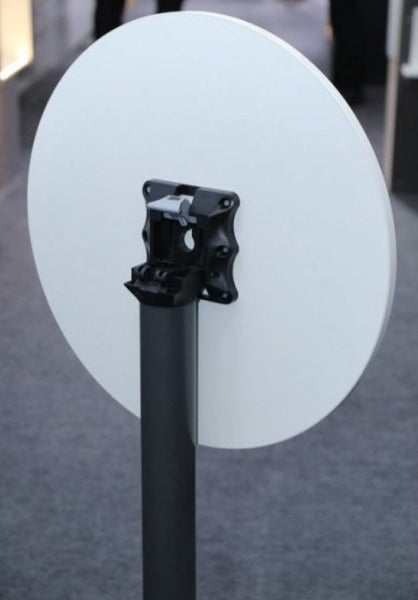
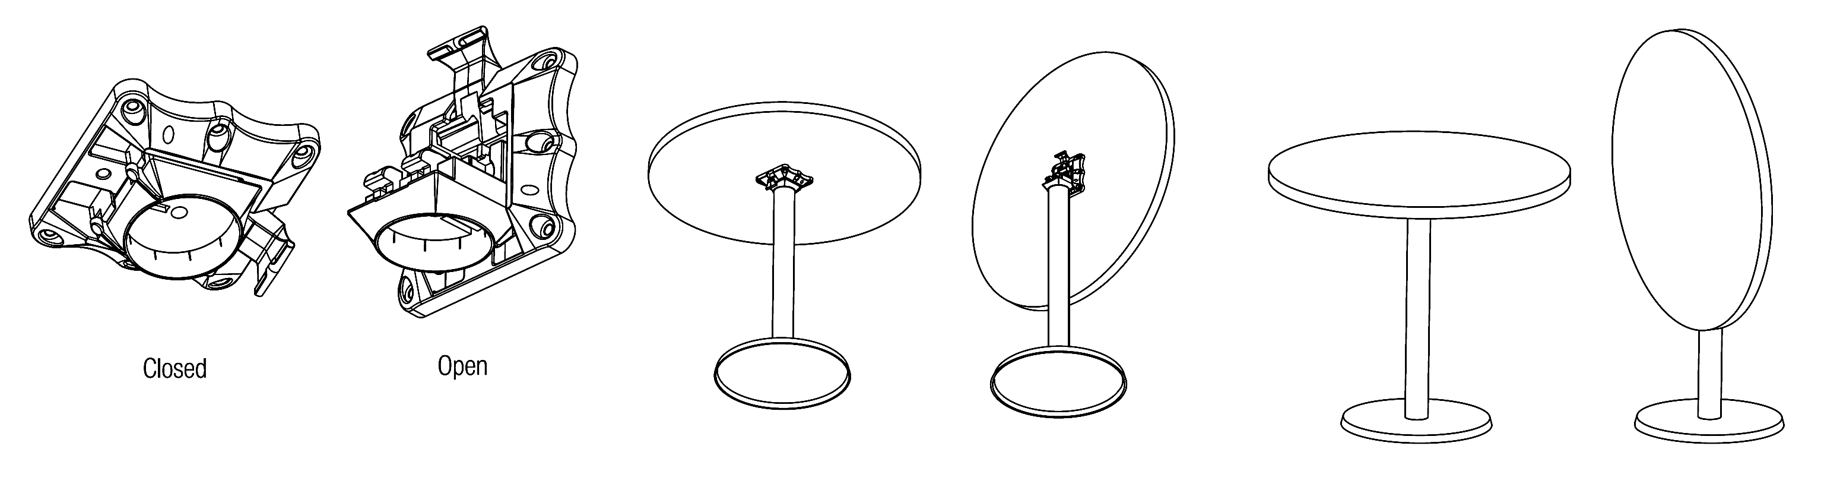
Table top grommet mounting with single arm.
Easy to fit.
Height adjustment of 100mm.
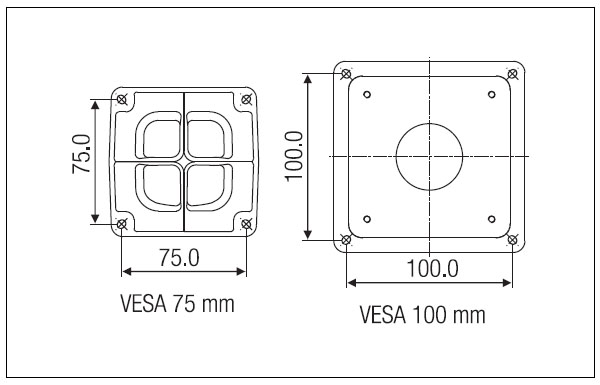
Compatible for VESA 75 x 75 & VESA 100 x 100 with an extra plate.
Die cast for good aesthetics.
Can be rotated towards left & right as well as tilted up & down with a single knob.
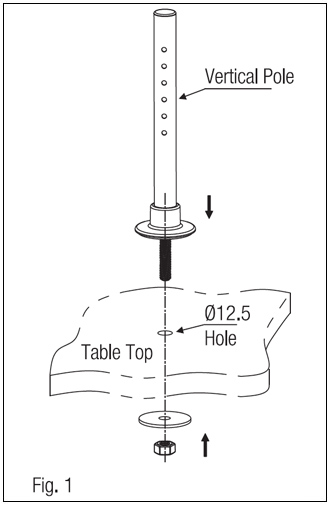
FITTING INSTRUCTIONS
Drill Ø 12.5mm hole through out on table top on the desired position.
Fix the vertical pole as shown in fig. 1.
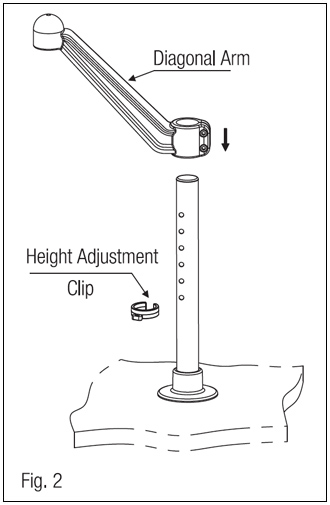
Clip the height adjustment clip on to the one of the holes on the vertical pole and slide the diagonal arm on to the pole from top till the bottom face of the arm rests on the height adjustment clip as shown in Fig. 2.
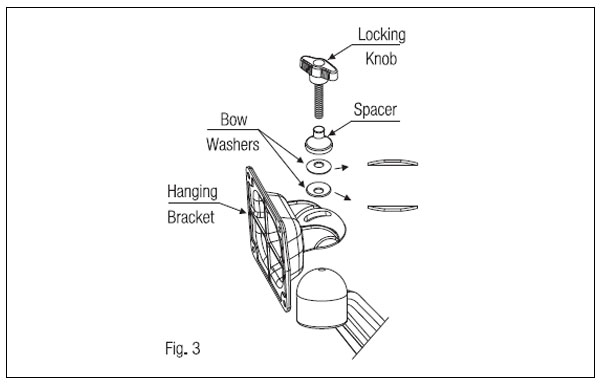
Assemble the other parts as shown in Fig. 3.
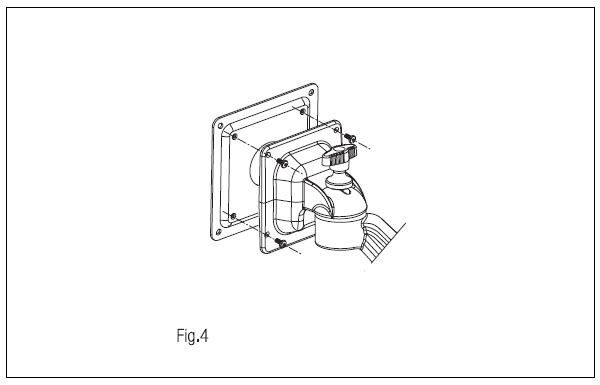
For VESA 100mm model, screw the 100mm plate to the hanging bracket with M4 screws as shown in Fig. 4.
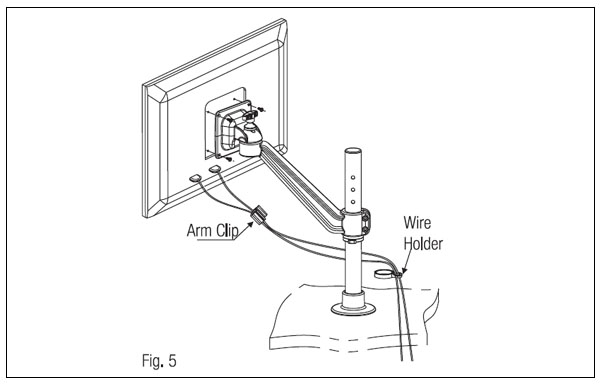
Screw the flat screen to the hanging bracket with M4 screws provided as shown in Fig. 5.
Insert the monitor cables in to the arm clip and wire holder, then clip them to the diagonal arm and vertical pole respectively, as shown in Fig. 6.
As per store shipping policy. If you need any other finish please contact our sales team.
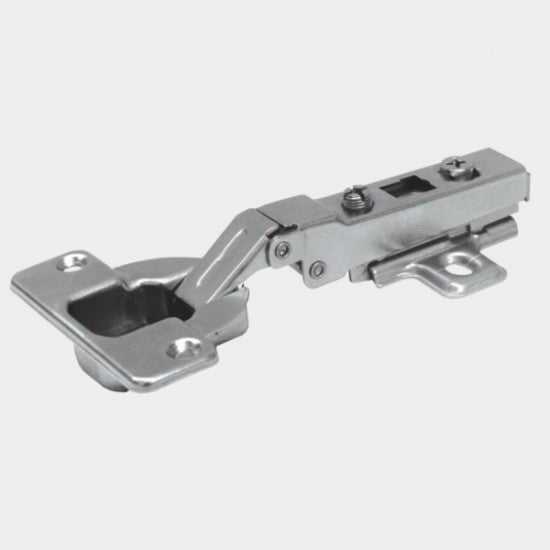
Max. Shutter size: 34" x 22"(850mm x 550mm) for 2 hinges.
Shutter Thickness: 18mm to 30mm.
Shutter cavity: Ø40mm, 14 deep, 4mm from edge.
Finish: Nickel Plated
SPECIFICATIONS:-
Item
Code No
A'mm
Finish
Hinge - Full Overlay
HTD1
40
NP
Hinge - Half Overlay
HTD2
40
NP
Hinge- Inset
HTD3
40
NP
FITTING INSTRUCTIONS
Drill out the cavity in the shutter as per the dimensions in Fig.1. Use 'ebco' Drilling jig. Do not chisel.
Fit the cap into the shutter cavity and screw on the hinge at right angle to the edge of the shutter. The hinges must not be hammered.
Mark hole in the cabinet for mounting plate as per Fig.2. and screw on the mounting plate.
Now, align the shutter with the cabinet, slip-on and screw the hinge on to the mounting plate. Any play or gap in cabinet can be adjusted in the bracket.
By loosening the bracket screws, the shutter can slide horizontally and also be pivoted for varying pressure.
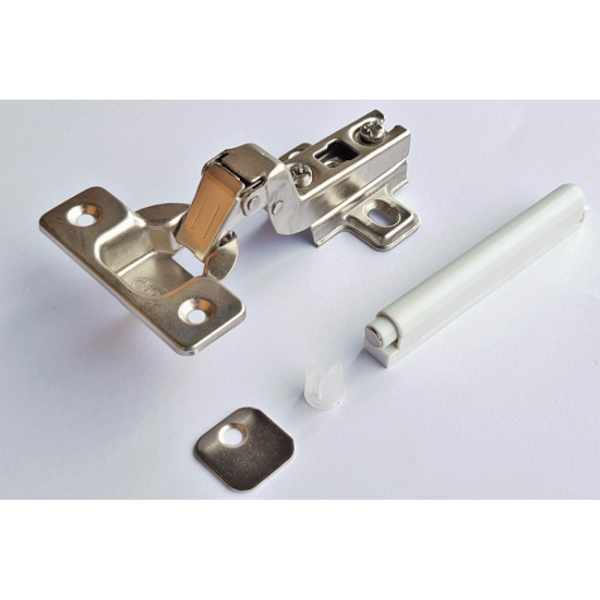
EBCO Push Open Hinges (With magnetic push open fittings) HPO-POM
Rs. 204.00
DESCRIPTION
This new hinge with special reverse spring enables automatic opening of door by exerting small amount of pressure to the door.
Available in Full Overlay, Half Overlay and Inset. For shutter thickness of 16mm to 19mm
SPECIFICATIONS:-
Item
Code No
A'mm
Finish
Hinge - Full Overlay
HPO1-POM
35
NP
Hinge - Half Overlay
HPO2-POM
35
NP
Hinge - Inset
HPO3-POM
35
NP
FITTING INSTRUCTIONS
Drill out the cavity in the shutter as per the dimensions in Fig.1. Use 'ebco' Drilling jig. Do not chisel.
Fit the cap into the shutter cavity and screw on the hinge at right angle to the edge of the shutter. The hinges must not be hammered.
Mark hole in the cabinet for mounting plate as per Fig.2. and screw on the mounting plate.
Now, align the shutter with the cabinet, slip-on and screw the hinge on to the mounting plate. Any play or gap in cabinet can be adjusted in the bracket.
By loosening the bracket screws, the shutter can slide horizontally and also be pivoted for varying pressure.
*If you have any specific question related to the product, please contact us.
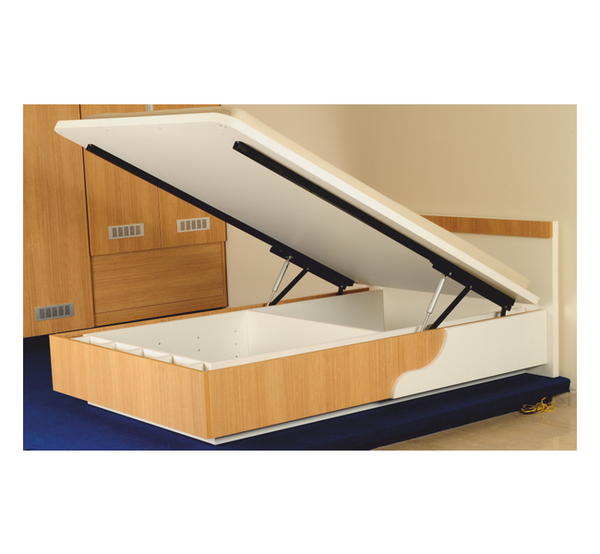
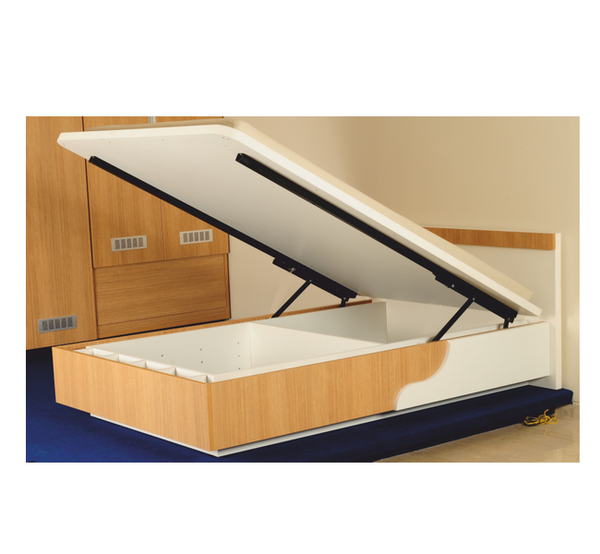
Fit the Fix BrackeKg)ts on bed frame as per given dimension. (Ref. Fig.1) without the gas spring fitted.Now fix the bed platform to the top brackets. (Ref. Fig.2).
*If you have any specific question related to the product, please contact us.
Fit the Fix BrackeKg)ts on bed frame as per given dimension. (Ref. Fig.1) without the gas spring fitted.Now fix the bed platform to the top brackets. (Ref. Fig.2).
3ft regular PLBF-EF-R, With Gas Lift PLBF 150C (KG)
Finish
Black
Set
Pair
*If you have any specific question related to the product, please contact us.
Fit the Fix BrackeKg)ts on bed frame as per given dimension. (Ref. Fig.1) without the gas spring fitted.Now fix the bed platform to the top brackets. (Ref. Fig.2).
*If you have any specific question related to the product, please contact us.
Fit the Fix BrackeKg)ts on bed frame as per given dimension. (Ref. Fig.1) without the gas spring fitted.Now fix the bed platform to the top brackets. (Ref. Fig.2).
*If you have any specific question related to the product, please contact us.
Fit the Fix BrackeKg)ts on bed frame as per given dimension. (Ref. Fig.1) without the gas spring fitted.Now fix the bed platform to the top brackets. (Ref. Fig.2).
*If you have any specific question related to the product, please contact us.
Fit the Fix Brackets on bed frame as per given dimension. (Ref. Fig.1) without the gas spring fitted.Now fix the bed platform to the top brackets. (Ref. Fig.2).
*If you have any specific question related to the product, please contact us.
Fit the Fix Brackets on bed frame as per given dimension. (Ref. Fig.1) without the gas spring fitted.Now fix the bed platform to the top brackets. (Ref. Fig.2).
*If you have any specific question related to the product, please contact us.
Fit the Fix Brackets on bed frame as per given dimension. (Ref. Fig.1) without the gas spring fitted.Now fix the bed platform to the top brackets. (Ref. Fig.2).
*If you have any specific question related to the product, please contact us.
Fit the Fix Brackets on bed frame as per given dimension. (Ref. Fig.1) without the gas spring fitted.Now fix the bed platform to the top brackets. (Ref. Fig.2).
*If you have any specific question related to the product, please contact us.
Fit the Fix Brackets on bed frame as per given dimension. (Ref. Fig.1) without the gas spring fitted.Now fix the bed platform to the top brackets. (Ref. Fig.2).
*If you have any specific question related to the product, please contact us.
Fit the Fix Brackets on bed frame as per given dimension. (Ref. Fig.1) without the gas spring fitted.Now fix the bed platform to the top brackets. (Ref. Fig.2).
*If you have any specific question related to the product, please contact us.
Fit the Fix Brackets on bed frame as per given dimension. (Ref. Fig.1) without the gas spring fitted.Now fix the bed platform to the top brackets. (Ref. Fig.2).
*If you have any specific question related to the product, please contact us.
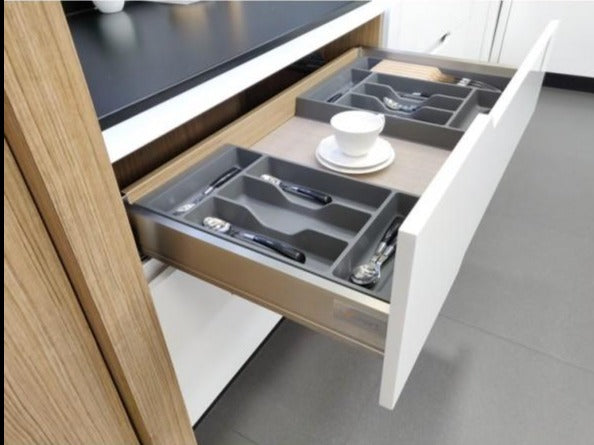
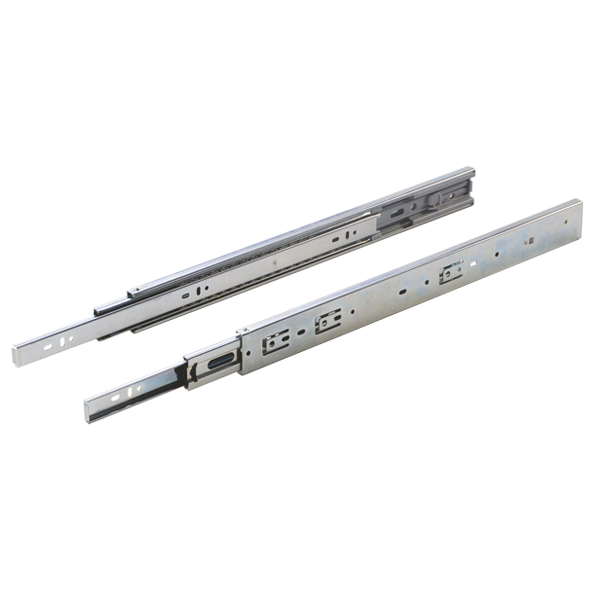
To install sleek telescopic drawer slide soft close 12.7 to13.0mm gap per side is required between cabinet and drawer. (Refer Fig. 1)Depress latch and remove the inner slide. (Refer Fig. 2)Fit outer (fixed) slide onto the inside of the cabinet, access to holes can be got through slots in intermediate slide.Slides should be fitted parallel and screws tightened fully to avoid gaps.Fit inner slide onto the outside of the drawer.Now slide the drawer with inner slide fitted on to the intermediate slides on the cabinet till the latch will automatically engage.